If your question is not addressed below, please contact us through our support form and we'll get back to you shortly.
- What is disk imaging and how does it work?
- How do I backup my computers using IDrive® Mirror?
- How do I backup an individual disk partition of my computer?
- How do you schedule a backup with IDrive® Mirror?
- Will the subsequent changes in my already backed up files be transferred to IDrive® Mirror incrementally?
- I am receiving ‘‘INSUFFICIENT_SPACE_FOR_SNAPSHOT’’ error while trying to perform a backup of my computer. How do I resolve this issue?
- Can I perform backup for more than one computer with Mirror?
- Which types of volumes are supported for backup by IDrive® Mirror?
- How does IDrive® Mirror optimize data transfers?
- How does IDrive® Mirror ensure that the backed up data is reliable for restore?
- How long can I retain the backed up data to my IDrive® Mirror account?
- Does IDrive® Mirror back up online-only files from cloud applications like Dropbox?
- Can I stop ongoing backups of all my devices in one click?
- What is a backup plan?
- How do I propagate backup plans to my computers?
- I have received a conflict alert while creating a backup plan. What should I do?
- Can I disable the backup plan?
- How can I delete a backup plan?
- How do I modify an existing backup plan?
What is disk imaging and how does it work?
IDrive® Mirror uses the disk imaging feature to backup single/multiple partitions, or run a full image backup of the hard drive including the OS, system settings, installed applications, etc., while creating recovery points for future point-in-time restore.
You can backup single or multiple partitions or your whole hard disk drive (including its operating system, settings, application configurations, and associated VMs) through IDrive® Mirror.
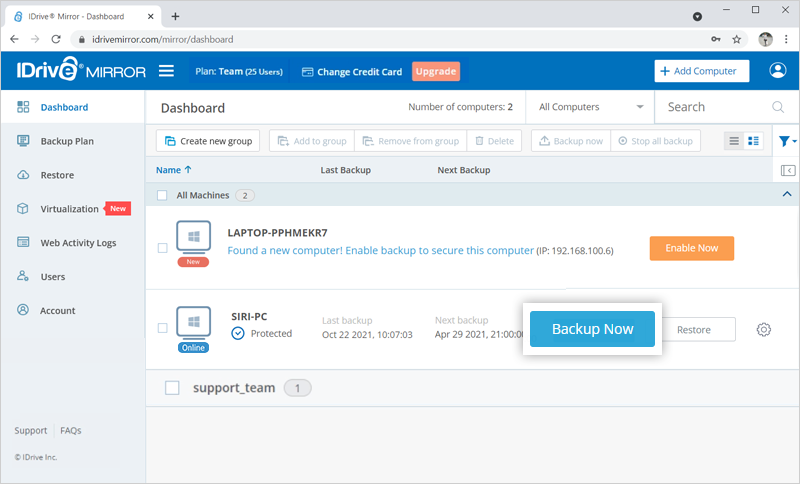
Once you enable backup for your computer, the ‘Backup Now’ button appears next to the enabled computer.
To perform a backup of your computer,
- Sign in to your IDrive® Mirror account.
- Click 'Backup Now' next to the computer you want to backup.
For the first time, IDrive Mirror will perform a full image backup of your computer. The subsequent backups will be incremental.
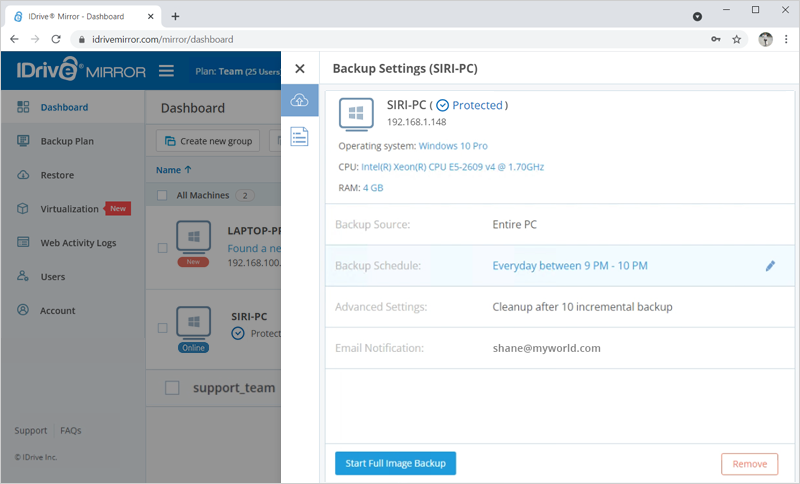
To start a full disk-image backup of your computer,
- Click
 next to the computer you want to perform a full image backup.
 - In the 'Backup Settings' screen, click 'Start Full Image Backup'.
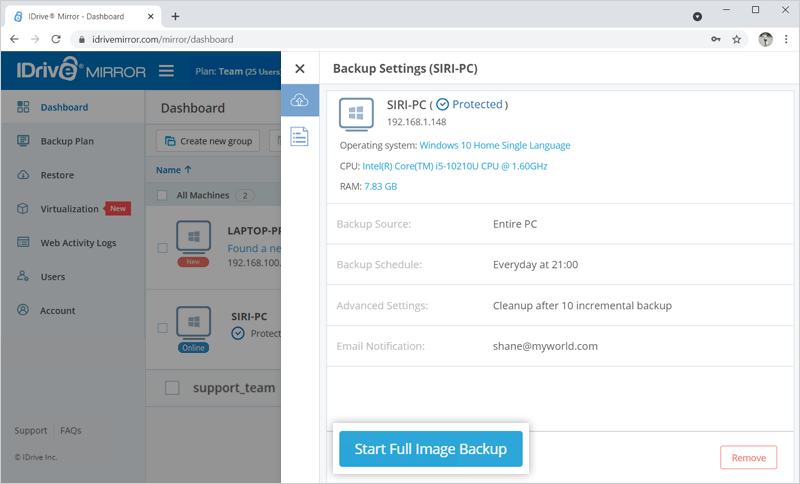
The backup progress will be displayed on the screen.
You can also schedule backup for your computer from the 'Backup Schedule' section in the slider window. Schedule backups daily or customize backups by selecting the required days and hours. You can even set an interval between consecutive backups.
By default, IDrive® Mirror selects your entire PC for backup to the cloud. However, you have the option to customize the backup source and upload data from specific drives of your computer.
- Sign in to your IDrive® Mirror account.
- Click
 next to the computer you want to backup.
 - Click the 'Backup Schedule' tab in the slider window.
- Click 'Customize'.
By default, all the drives are selected for backup. - Deselect the drives that you do not want to backup.
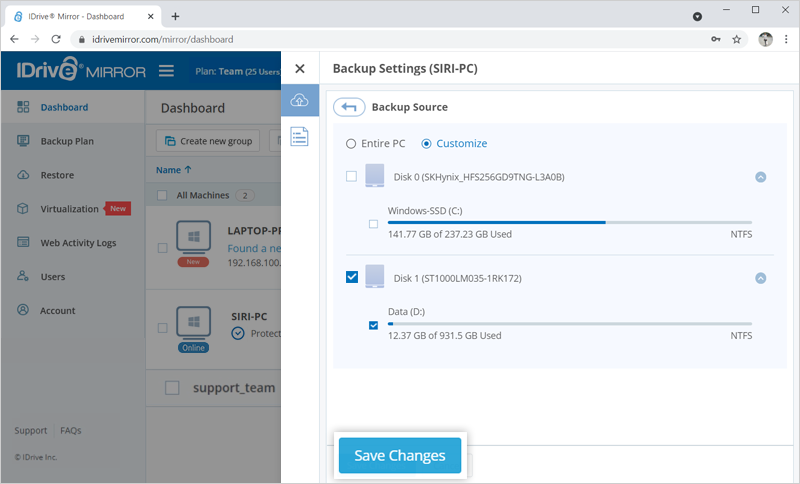
- Click 'Save Changes'.
To backup a disk partition,
Note: If you deselect the drive where the operating system is installed, you will not be able to restore the entire computer.
- Sign in to your IDrive® Mirror account.
- Click next to the computer you want to create a schedule.
- Click the 'Backup Schedule' tab in the slider window.
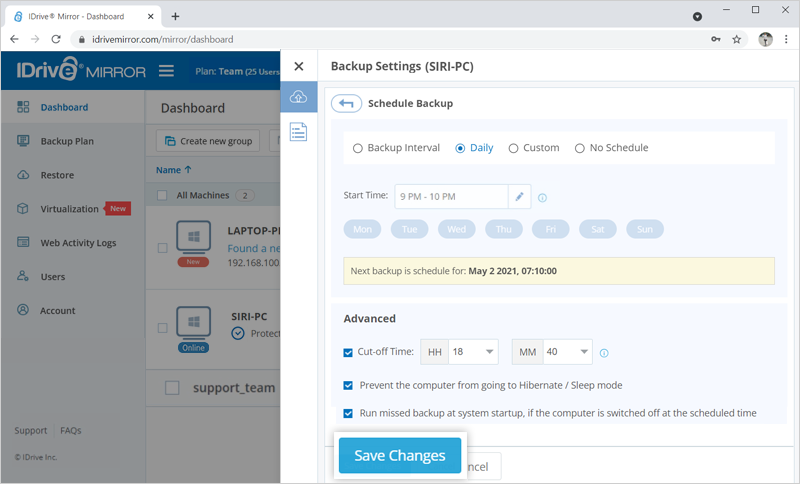
The 'Schedule Backup' window will appear. - To apply backup settings modify the following options as required:
- Backup Interval: Set the desired interval between consecutive backups from here.
- Daily: Select this radio button if you want to schedule daily backups and set the backup start time.
- Custom: Select this radio button to customize your backup on the required days and hours of the week.
- No Schedule: Click this radio button to disable all scheduled backup settings.
- Start time: Set the time range for your scheduled backup to start. The backup will start within the selected time range. For example, a backup scheduled to start between 7.00 AM - 8.00 AM may commence any time within this period.

Note: If the backup is set to start at a time that has already elapsed for the day, the backup will be scheduled for the next day. For example, if you set a backup schedule to start between 2.00 PM - 3.00 PM and if the scheduled time has elapsed for the day, the backup will commence on the next day.
In the 'Advanced' section, set the cut-off time for stopping the scheduled backup at your desired time. You can also set options to prevent your computer from going to hibernate/sleep mode and run missed backup on system startup if the computer was turned off during backup. You can even wake up your computer from hibernate/sleep mode at the scheduled backup time.
- Click 'Save Changes'.
To schedule backups,
Backups will occur according to the saved schedule.
Will the subsequent changes in my already backed up files be transferred to IDrive® Mirror incrementally?
Yes, after the full initial image backup subsequent changes are backed up incrementally and synced with the existing data through scheduled data synchronization.
I am receiving ‘‘INSUFFICIENT_SPACE_FOR_SNAPSHOT’’ error while trying to perform a backup of my computer. How do I resolve this issue?
IDrive Mirror uses the Windows VSS service to store snapshots on the source volume that is being backed up. On a volume with no activity, a snapshot uses only minimal storage. However, if files are added, modified, or deleted while the snapshot is active, the storage required can increase significantly. When the volume does not have enough free space a new snapshot cannot be created, resulting in this error. To prevent this, it is recommended to keep at least 30% free space on the source volume to allow snapshot creation.
For example:
Drive E: has a total storage space of 50 GB, with 45 GB used and 5 GB free (90% full). In this scenario, the initial snapshot may succeed. However, if you delete 5 GB of data and then add 5 GB of new data, there may not be enough disk space on volume E: to expand the storage for snapshots. As a result, VSS may trigger this error.
How to resolve this:
- Make sure the source volume has enough free space before starting a backup.
- Avoid large file operations such as mass copies or deletions while backup is in progress.
- Exclude volumes with very low free space if ‘Entire PC’ is selected as the backup source.
- Delete unnecessary files or old snapshots to free up space on the source volume.
Once enough space is available on that drive, try the backup again. For more information, refer to this VSSAdmin Resize ShadowStorage guide on docs.microsoft.com.
Yes, you can perform backup for multiple Windows computers with IDrive® Mirror directly to the cloud. You can see the list of configured computers in the 'Dashboard' tab. You can select individual or multiple computers at a time from the list for backup.
IDrive Mirror currently supports backup of non-removable NTFS volumes only, which are fixed internal drives (HDDs or SSDs) formatted with the NTFS file system.
However, restores are supported for both fixed and removable volumes, offering flexible recovery options.
IDrive® Mirror transfers only the modified portions of your files after full initial transfer by utilizing the Changed Block Tracking (CBT) technology which conducts up to three times faster backup to optimize your bandwidth usage.
To ensure reliability of the backed up data, IDrive® Mirror runs an immediate data integrity check after each volume is backed up. The data integrity check ensures that only the reliable copies of data are stored during backup and can be restored.
The data in your IDrive® Mirror account is cleaned up periodically based on the Cleanup settings defined by you in the web console.
To define Cleanup settings,
- Sign in to your Mirror account.
- Click next to the computer you wish to update Cleanup settings.
- In the 'Backup Settings' window, click 'Advanced Settings'.
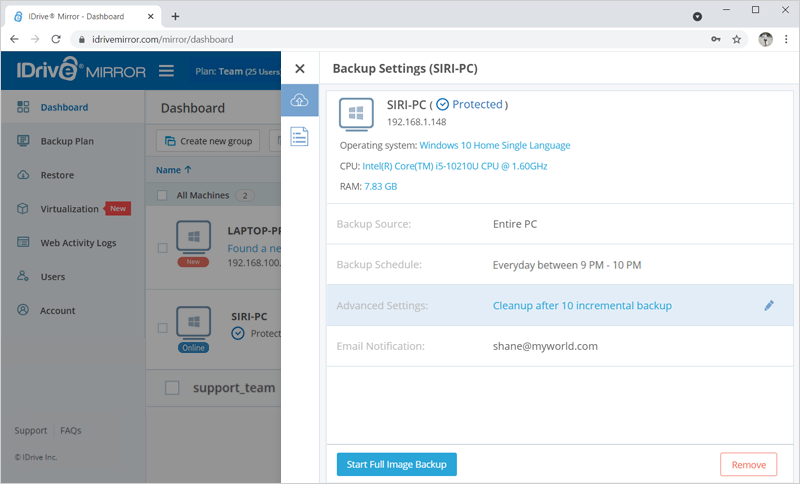
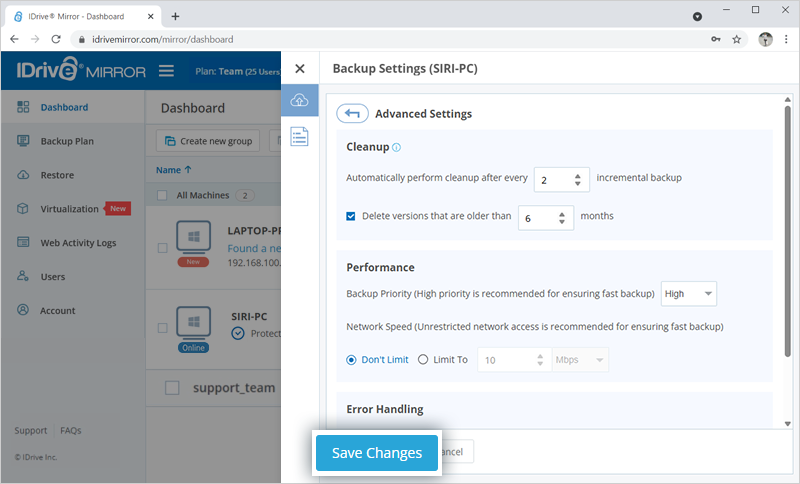
- Set the following options in the 'Cleanup' section:
- Automatically perform cleanup after every '-' incremental backup
- Delete versions that are older than '-' months
- Click 'Save Changes'.
No, IDrive Mirror only backs up offline files that are locally available on your computer. Online-only files, which are stored in the cloud and not physically present on the device, are not backed up with actual data. Instead, a placeholder (pseudo file) is created in the backup to indicate the file’s presence without containing its content.
Yes, you can stop ongoing backups of all your devices, in one click.
To stop ongoing backups,
- Sign in to your IDrive® Mirror account.
- Go to the 'Dashboard' tab.
- Select the computers for which you wish to stop the ongoing backup operations.
- Click 'Stop all current backups'.
- In the confirmation popup that appears, click 'Ok'.
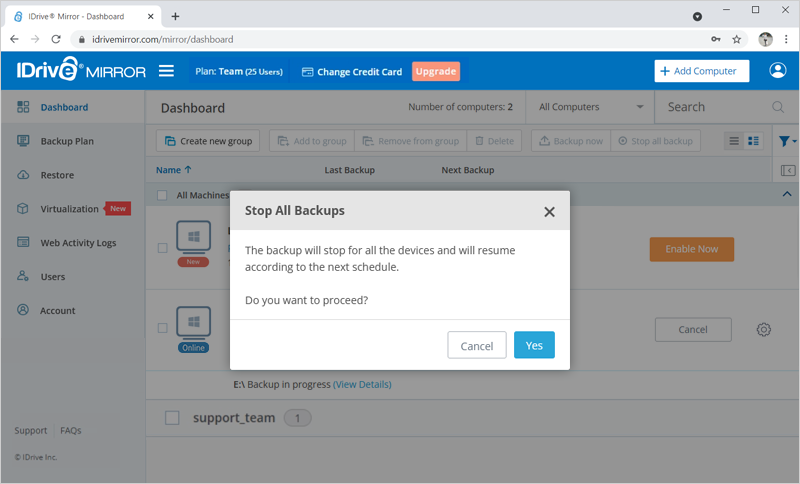
Note: All ongoing backups will stop and will resume at the next schedule. This operation may take some time.
A backup plan consists of a group of settings that specify how the data will be protected on a particular computer.
On creating your IDrive® Mirror account, a backup plan is created by default with predefined settings and applied to the added computers. The same can be viewed from the ‘Backup Plan’ tab. You can modify the backup settings, rename the plan name, disable the same, but you cannot delete the default backup plan.
You can also create a backup plan with specific backup configurations and push it to selected computers in a go.
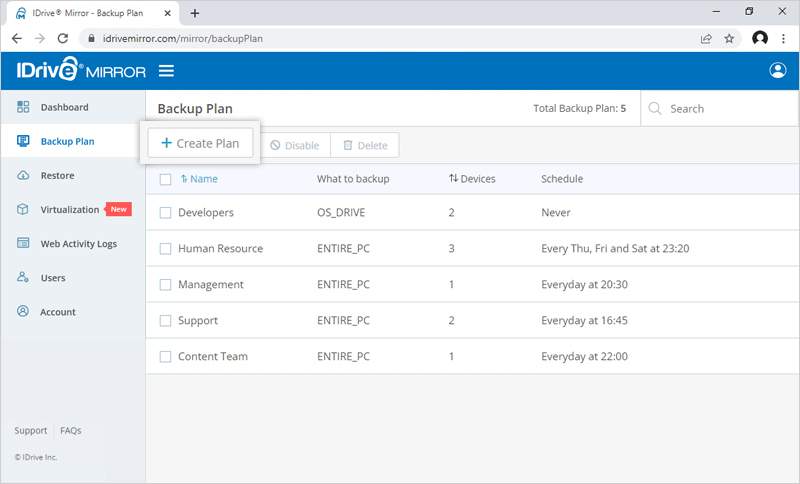
To create a backup plan,
- Sign in to your IDrive® Mirror account.
- Go to the 'Backup Plan' tab and click 'Create Plan'.
- Hover over the default plan name, click
 and the 'Rename Backup Plan' popup appears. Enter the desired name and click 'Save'.

- Modify the menu options:
Devices: Select computers to be added from the list of devices. Click 'Done'.
What to backup?: From the drop-down list choose ‘Entire PC’ or ‘Only OS Drive’ to backup.
Schedule: You can set your backup schedule here and click 'Done'.
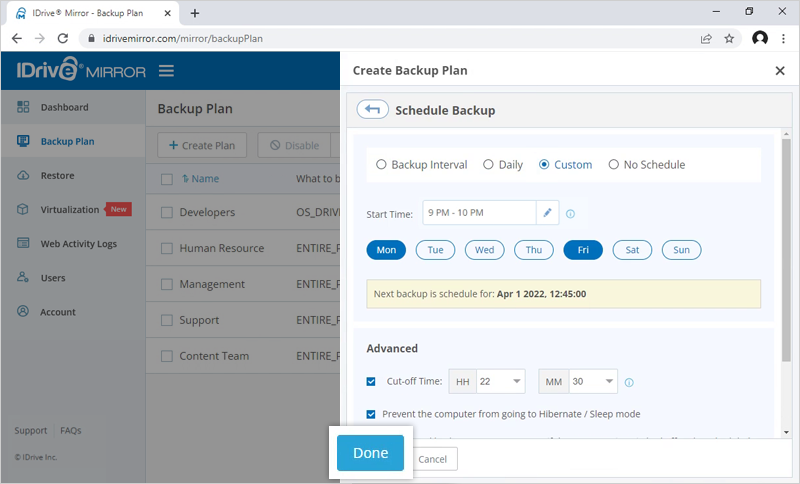
- Backup Interval: Set the desired interval between consecutive backups from here.
- Daily: Select this radio button if you want to schedule daily backups and set the backup start time.
- Custom: Select this radio button to customize your backup on the required days and hours of the week.
- No Schedule: Click this radio button to disable all scheduled backup settings.
- Start time: Set the time for your scheduled backup to start.
In the 'Advanced' section, set options to wake up your computer from hibernate/sleep mode for backup and run missed backup on system startup if the computer was turned off during backup.
Advance Settings: Select this button to change the cleanup and performance settings as required. Set up automated cleanup and other performance parameters such as backup priority and network speed that ensure speedier backup.
Email notification: Select this option to receive email notifications on the status of the scheduled backup job. Enter the email address on which you want to receive the notifications.
- Notify always - Select this option to get notifications always.
- Notify on failure - Select this option to get the notifications only when there are failures.
- Start the missed scheduled backup when the computer is turned on: Select this option to resume a missed scheduled backup job due to the computer being turned off.
- Click 'Create'.
Once created, the backup plan will be applied automatically to the selected computers and the backup will start at the scheduled time, as per the chosen option.
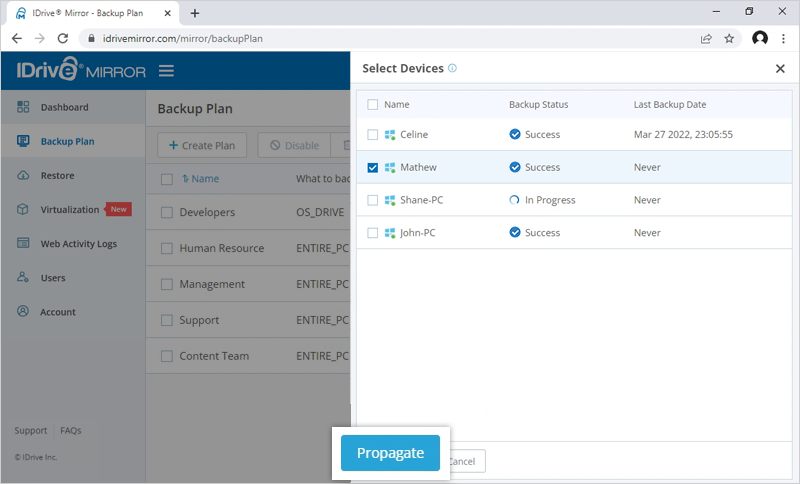
To propagate a backup plan,
- Sign in to your IDrive® Mirror account.
- Go to the 'Backup Plan' tab.
- Hover on the backup plan name you wish to propagate, and click
 .
.
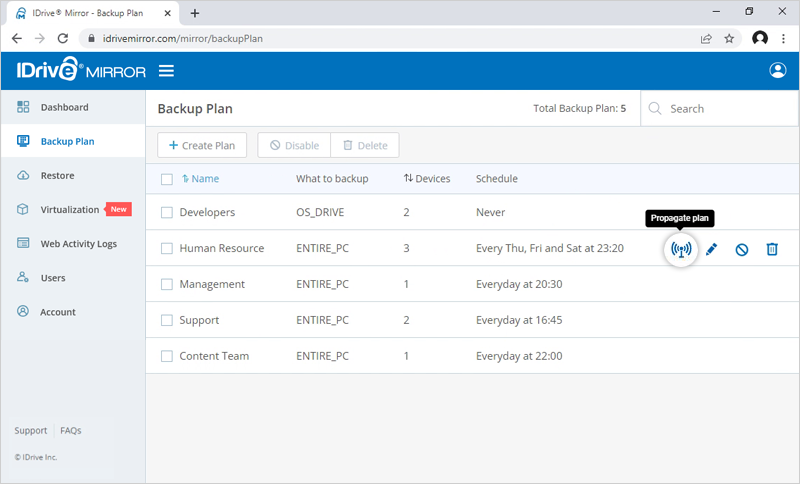
- Select the computers to which you want to propagate the backup plan from the list of devices.
- Click 'Propagate'.
A conflict may occur when you try to create a backup plan for a computer that is already part of another backup plan.
In such cases, you can view the details of the conflict and choose to remove the existing backup plan for the computer and apply the new plan for the same. The already applied plans will then be disabled for the computers.
Yes, you have the option to disable a backup plan.
To disable,
- Sign in to your IDrive® Mirror account.
- Go to the 'Backup Plan' tab and select the backup plan you wish to disable.
- Click the 'Disable' button.
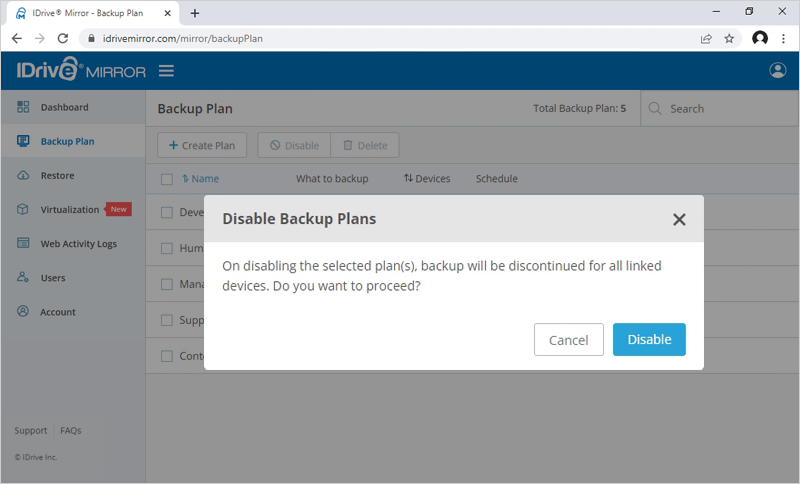
- In the popup that appears, click 'Disable'.
To enable the same, select the backup plan and click the 'Enable' button. Click 'Yes' in the popup that appears.
To delete a backup plan,
- Sign in to your IDrive® Mirror account.
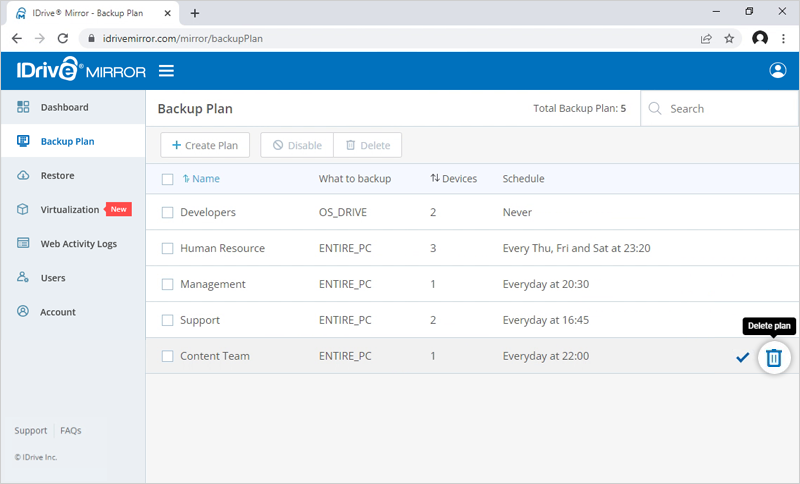
- Go to the 'Backup Plan' tab and select the backup plan you wish to delete.
- Click the 'Delete' button.
- In the popup that appears, select the confirmation checkbox and click 'Delete'.
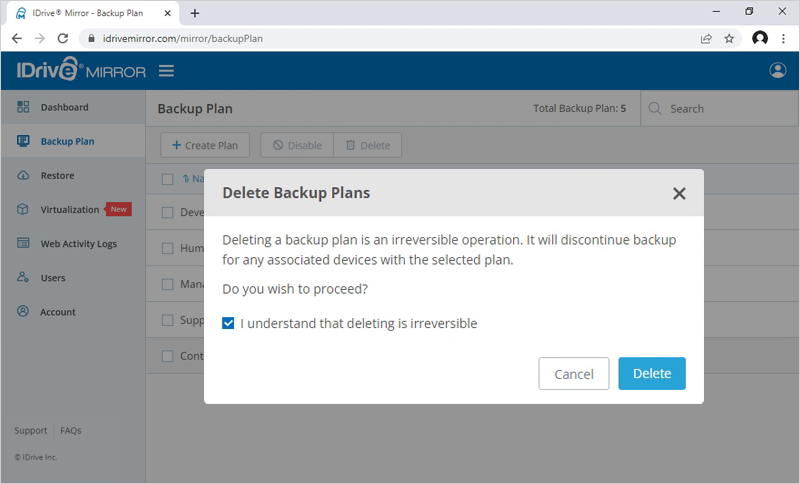
On deleting a backup plan, all the backups with the configured settings will be discontinued for the associated computers.
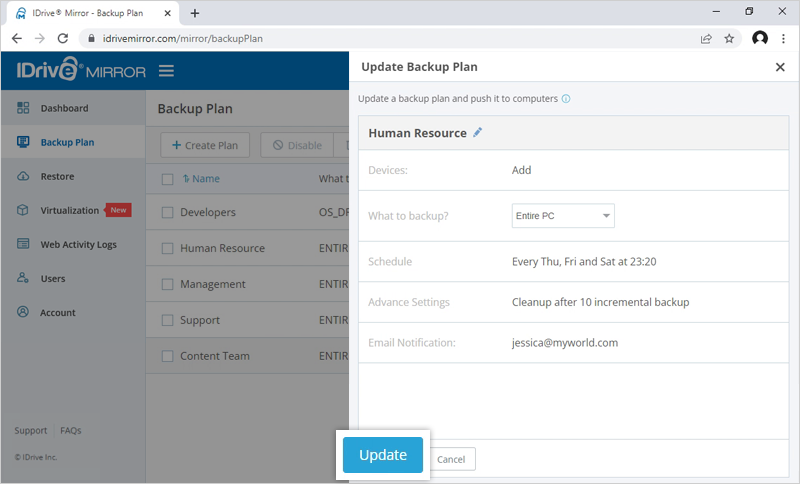
To modify an existing backup plan,
- Sign in to your IDrive® Mirror account.
- Go to the 'Backup Plan' tab and navigate to the backup plan you wish to modify. Hover on the backup plan name and click .
- In the 'Update Plan' screen that appears, modify your backup plan details and click 'Update'.
A group is a collection of selected computers. You can create any number of groups, and add computers to it.
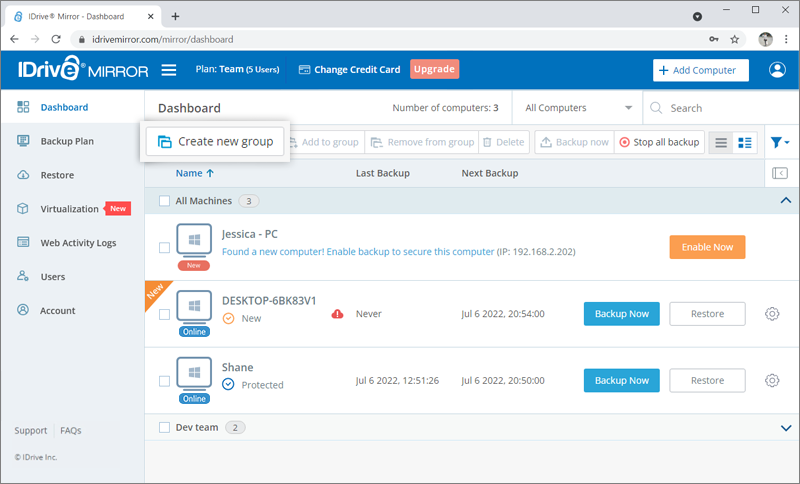
To create a group,
- Sign in to your IDrive® Mirror account.
- In the 'Dashboard' tab, click 'Create new group'.
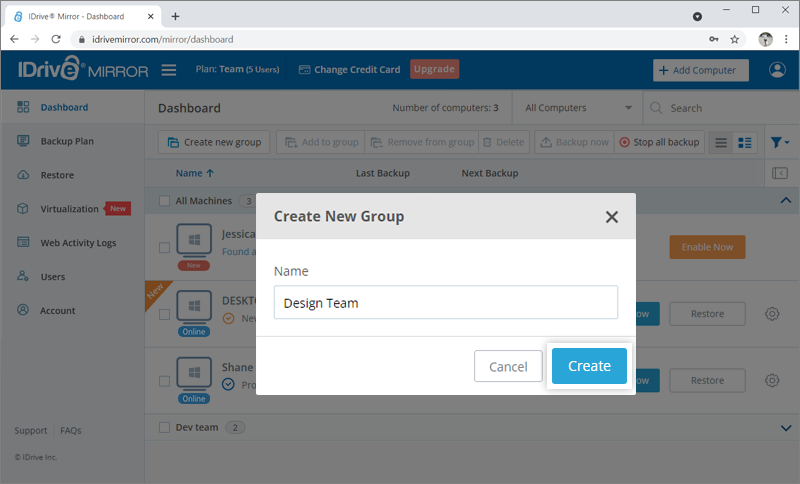
- In the popup that appears, enter a name for the new group and click 'Create'.
To add computers to a group,
- In the 'Dashboard' tab, select the computers you wish to add to a group and click 'Add to group'.
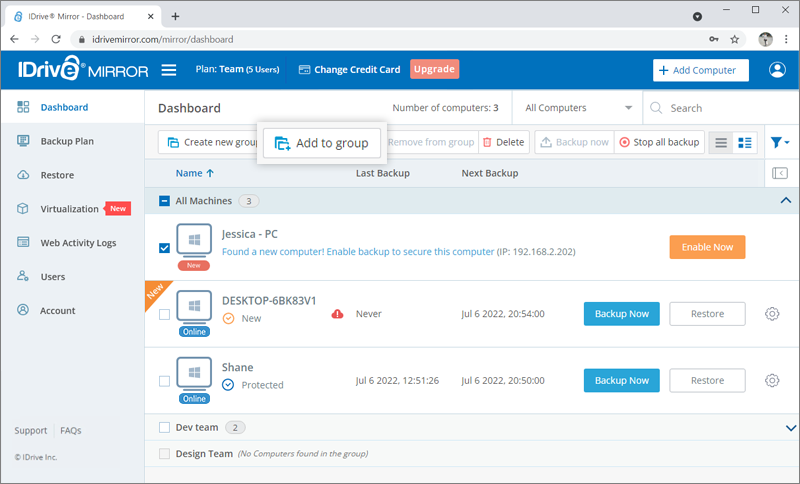
- From the list that appears, select the group to which you wish to add the computers, and click 'Add'.
Note: Click 'New Group' to create a new group and add computers to it.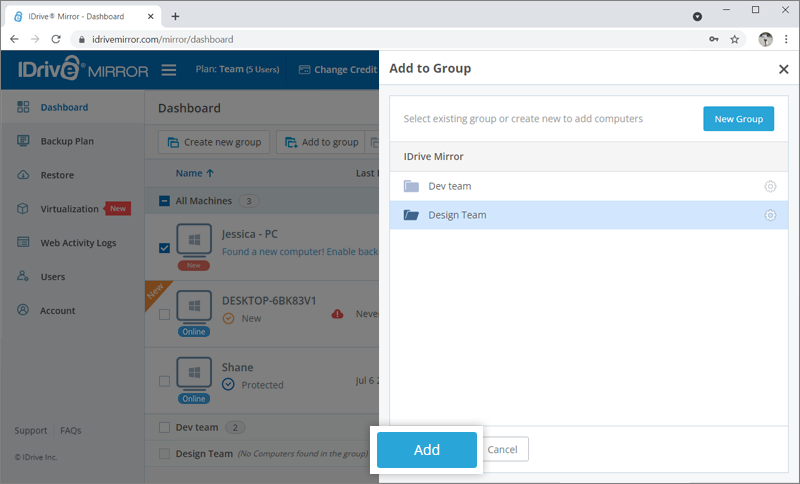
The computers will be added to the selected group.
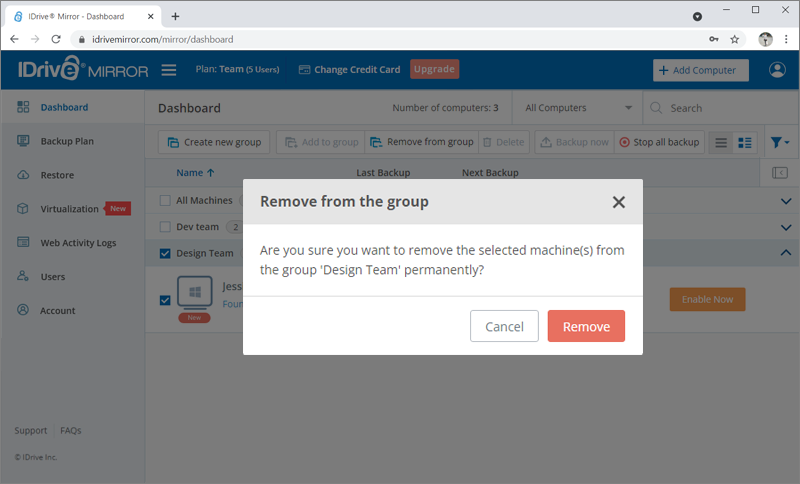
To remove computers from a group,
- In the 'Dashboard' tab, click a group name and all the computers in the particular group will be displayed.
- Select the computer(s) you wish to remove, and click 'Remove from group'.
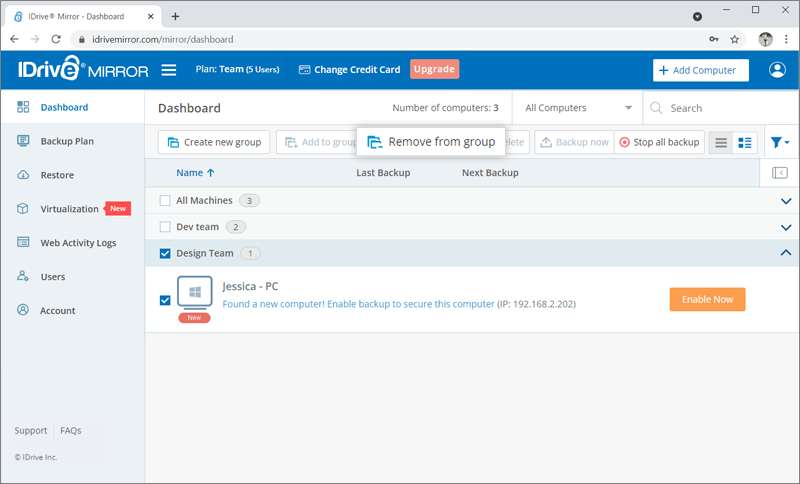
- In the popup that appears, click 'Remove'.
Yes, you can rename as well as delete a group.
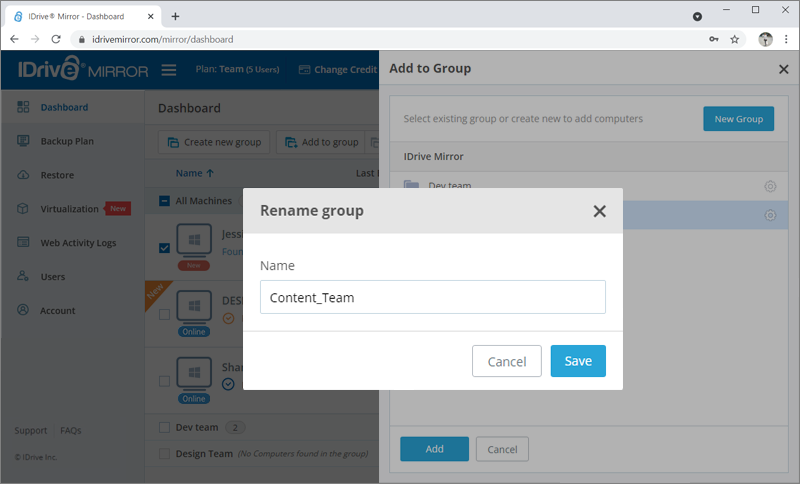
To rename a group,
- Sign in to your IDrive® Mirror account.
- In the 'Dashboard' tab, all the groups will be listed.
- Hover over the group you wish to rename and click .
- Click 'Rename'.

- Enter a new name in the popup that appears and click 'Save'.
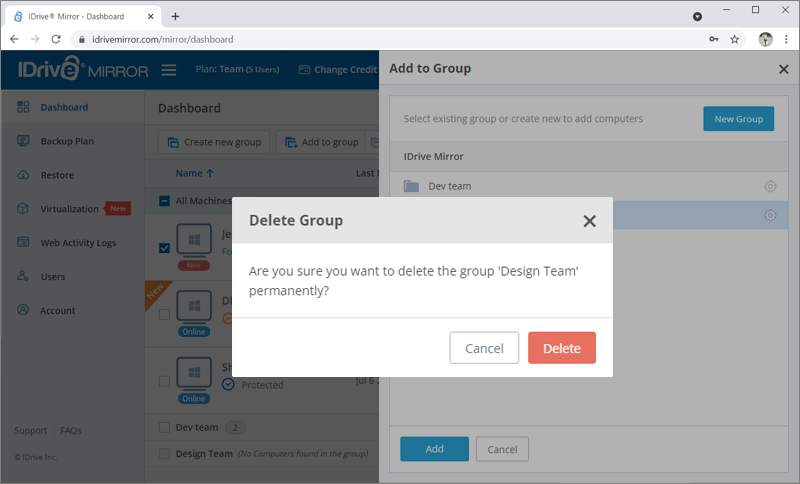
To delete a group,
- In the 'Dashboard' tab all the groups will be listed.
- Hover over the group you wish to delete and click .
- Click 'Delete'.
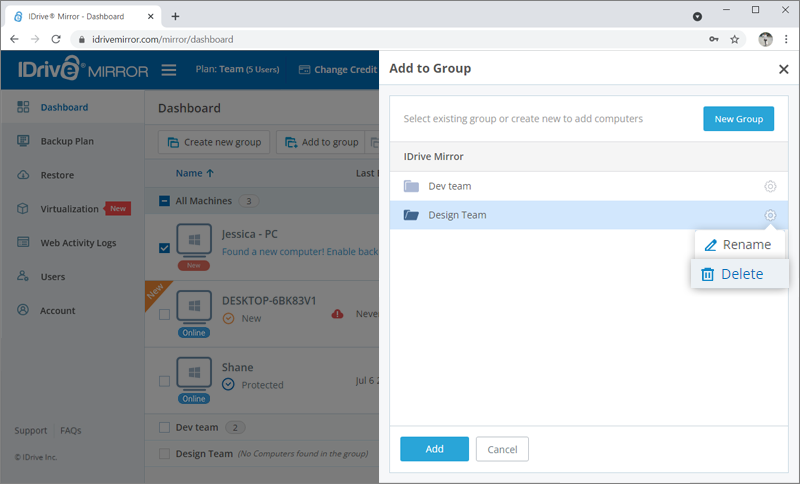
- In the popup that appears and click 'Delete'.